ECOMP 6016 Online
Teaching and Learning with Multimedia
Dr. George Blakeslee
Task 041b Mac Animation (Cel) using Quicktime
**Mac users -
For iPhoto & iMovie, follow the instructions given below.
Post your Task 041b Animation as an attachment to a reply to the Task 041b Discussion Board thread.
iPhoto & iMovie - Open and set preferences
Note: QuickTime movie animations do not automatically repeat as most animations do. To achieve repetition when using QuickTime animations, format the movie to LOOP CONTINUOUSLY.
II-A. With iPhoto on your Hard Drive (usually installed along with iMovie in Applications folder)
1. Launch iPhoto program.
2. Import Crazy Clock images (created in Task 041) into iPhoto library
- File > Import …
- In Import dialog box, navigate to folder containing Clock Face images (ie the one with MyClock01, MyClock02, etc. images)
- Click on each image to select it (or Shift-click the entire set at one time)
- Click Import button
3. Organize Clock Face images in an album
- Click on the + symbol at bottom left to create a New Album
- Click on Photo Library to view all images
- Click-and-drag each Clock Face to the Album
- Click on Album name to verify images are copied there
4. Launch iMovie
5. Click on Photo button to set iPhoto as the image source
The Clock Face images are shown in the Media Source Pane
II-B. Without iPhoto on your Hard Drive
1. Launch iMovie program.
2. Click on Clips button to set the image source
3. Import Crazy Clock images into Clip Media Source
- File > Import …
- In Import dialog box, navigate to folder containing Clock Face images (ie the one with MyClock01, MyClock02, etc. images)
- Click on each image to select it (or Shift-click the entire set at one time)
- Click Import button
III. Create and Save a New iMovie Project
1. Select
- File > New Project
- File > Save Project (preferably in Animation folder)
- Type Name for project
- Click Save
2. Drag Clock Face images to Video Track in sequence desired
Lesley University, 29 Everett Street, Cambridge, Massachusetts, USA 02138-2790
(c) George Blakeslee All Rights Reserved
Movie producer Ken Burns invented a techniques for adding visual interest to still pictures when used in video production. When he created The Civil War documentary film for PBS, he only had still pictures to work with. In order to produce a film that was not simply a slide show he developed a method for zooming in on a picture and then panning across it (with or without zoom out) as a narrator conveyed a related story. The method and film was well received, and the documentary won many awards and became a cultural classic. The method of panning and zooming became known as the ‘Ken Burns Effect’.
In iMovie, it is the default setting for the use of still images. But you do not always want to use this effect. A case in point is the Task 042 Frame Animation assignment. In order to turn off the Ken Burns effect, you will need to edit the iMovie preferences before beginning the project.
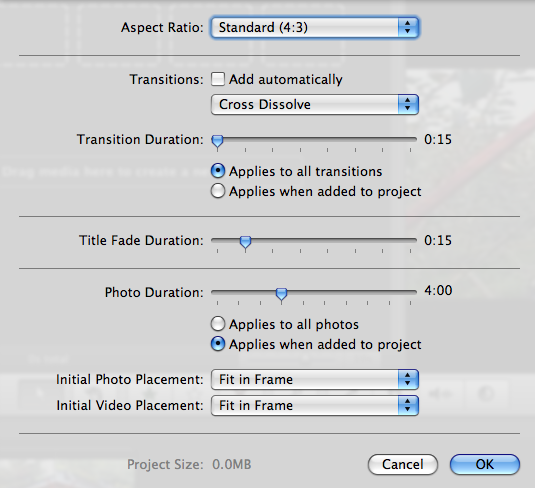
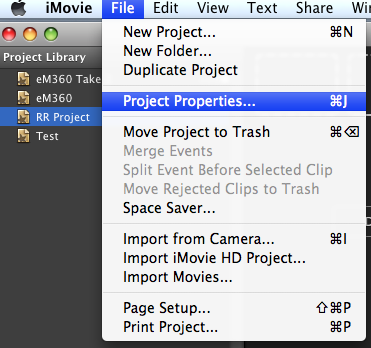
Before you import any images, set the "Project Properties"
Choose File > Project Properties
In the preference pane that comes up, set both "Initial Photo Placement" and "Initial Video Placement" to "Fit in Frame".
You can also set a default display time for each photo and a default transition if you like.
3. Set duration of each image
- Double-Click on first Clock Face image
- Chose Clip Inspector
- Type desired image duration
(shorter for animation (ie <0.1 sec))
(longer for ‘slide shows’ (ie = 1 to 5 sec))
- Check the Apply to All stills checkbox
- Click Done
4. Preview animation by clicking Play button
Adjust sequence and durations, as desired
5. Save animation project
Share > Export as QuickTime movie
Save As - Type Name for Animated QuickTime movie
- Task 042 aaa (where aaa are your initials)
Where - Note where movie will be saved
- Click Save
Post your Task 041b Animation as an attachment to a reply to the Task 041b Discussion Board thread.
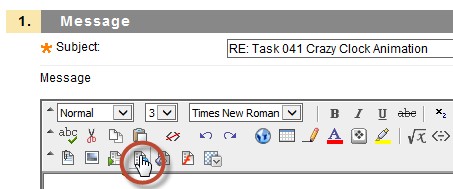
In the Reply dialog, click on the Add QuickTime Content button
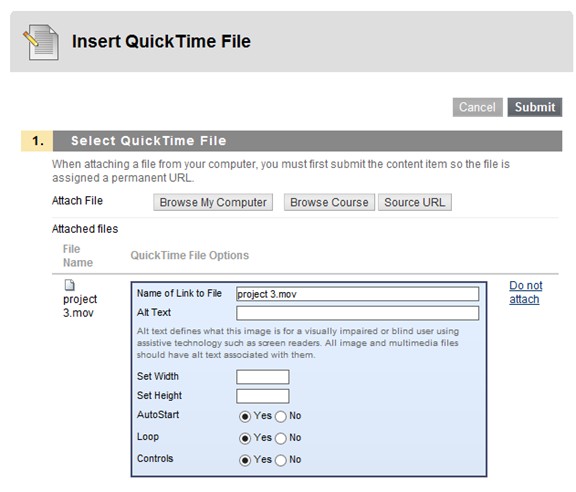
Use Attach File > Browse my Computer to locate the saved Quicktime Movie animation
Choose ‘Yes’ for:
Autostart
Loop
Controls
Click Submit to post your Animated GIF
