ECOMP 6016 Online
Teaching and Learning with Multimedia
Dr. George Blakeslee
Web Based (Cross Platform) Image Editing
** All Students -
Post your Tasks 024, 025, 026 and 027 Image Edits as a set of attachments to a reply to the Task 024-027 Discussion Board thread.
SumoPaint is a full featured, PhotoShop freeware equivalent, that is entirely web based.
Access the application at www.sumopaint.com
select an image and save the original file,
complete resize, crop, rotate and replace on original image and save each edited file.
The instruction pages available here specifically refer to SumoPaint, but the concepts are similar for most image editing programs.
Navigate to the Sumo Paint web site and complete the following tasks (instructions are given below):
Task 024 resize,
Task 025 crop,
Task 026 rotate, and
Task 027 replace
Sumo Paint Tutorial
1. Browse to www.sumopaint.com
Click on “Use Sumo Paint” image/icon
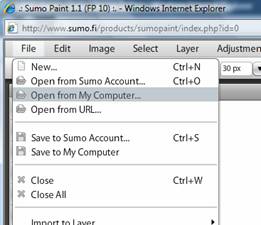
2. Open Image
File > Open from My Computer
Navigate to saved image and click on filename to select it
Click Open
3. Task 024 Resize Image
Click Image > Resize
Check ‘Constrain Proportions’
Type or Set new Pixel count or Percent
Click OK
Save Resized Image with File > Save to My Computer.
Rename Resized Image.
Choose JPG format and 100% Quality.
Click ‘Save’.
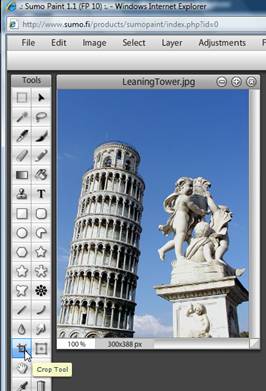
4. Task 025 Crop Image
Click on Crop Tool icon
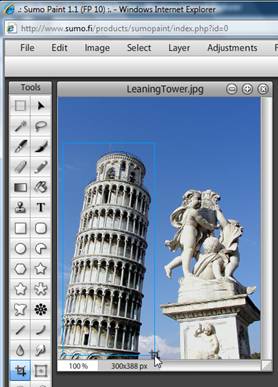
Use Crop Tool to ‘click-and-drag’ a Selected Area of Image
Image is Cropped, cutting away everything outside Selected Area, on Un-Click
Save Cropped Image with File > Save to My Computer.
Rename Cropped Image.
Choose JPG format and 100% Quality.
Click ‘Save’.
5. Task 026 Rotate Image
Choose Image > Rotate …
Image rotates on Click
Save Rotated Image with File > Save to My Computer.
Rename Rotated Image.
Choose JPG format and 100% Quality.
Click ‘Save’.
6a. Task 027 (option 1) Alter Image: Delete an Image Element (Clone nearby portion to ‘cover up’)
Open image by using ‘File > Open from My Computer’. Then Choose Clone Tool.
Choose Brush Shape.
Click on ‘Set Source Point’ icon.
Move Cursor to nearby area that will be duplicated to cover unwanted image element,
and Click once.
Move Cursor to unwanted image element, click-and-drag to remove by ‘cloning’ source area.
Save Edited Image with File > Save to My Computer.
Rename Edited Image.
Choose JPG format and 100% Quality.
Click ‘Save’.
6b. Task 027 (option 2) Alter Image: Add an Image Element
Open two images by using ‘File > Open from My Computer’ twice in succession.
Resize Larger Image #1 to reduce it to approximate Smaller Image #2 element size.
Cut out Smaller Image #2 element by using Select Tool and Edit > Cut. (May also Copy)
Place Smaller Image #2 element in Large Image #1 with Edit
Use the ‘Move Tool’ to click on Smaller Image #2 element and drag it into position.
Save Edited Image with File > Save to My Computer.
Rename Edited Image.
Choose JPG format and 100% Quality.
Click ‘Save’.
6c. Task 027 (option 3) Alter Image: Combine Images (Layers – Sandwich Method)
Open two images by using ‘File > Open from My Computer’ twice in succession.
Resize Larger Image to reduce it to approximate Smaller Image size.
Re-Save both Images with File > Save to My Computer.
Rename the "bread" Image as Image 1. Choose JPG format and 100% Quality. Click ‘Save’
Rename the "meat" Image as Image 2. .Choose JPG format and 100% Quality. Click ‘Save’
Close the images and start a new edit.
Open Image 1 (the "bread") with File > Open from My Computer.
Note Thumbnail Image in Layer Palette.
It is labelled Background
Next, Add Image 2 (the "meat") with File > Import to Layer > From My Computer.
Note the secondThumbnail Image in Layer Palette.
It is labelled Layer 1
Erase unwanted portions of "meat" Layer 1 - the middle layer.
Click on ‘Eye’ icons next to Layer 1 and Background to hide them from view.
Click “Eye’ icon for Layer 1 to Select it.
Click Magic Wand Tool to select. Set Tolerance to 55%.
Place cursor on unwanted portion and click to select it.
Use Edit > Cut to remove the unwanted portion.
A checkerboard pattern will show transparent areas of Layer 1.
Repeat as necessary to remove all of the unwanted portions.
.
Choose Select > Deselect to clear prior selection.
Click on Eraser Tool, select Circle Brush, and click and drag to erase any remaining unwanted pixels..
Click on Background Thumbnail in Layer Palatte.
Choose Duplicate Background Tool to Add Top Layer.of the sandwich - Layer 2
Note Layer 2 Thumbnail Image in Layer Palette.
Erase unwanted portions of Top Layer 2 to let Middle Layer 2 ("meat") and Background Layers show through.
Click on ‘Eye’ icons next to All Layers to hide them from view.
Click on Layer 2 “Eye’ to select it.
Click Magic Wand Tool to select. Set Tolerance to 55%.
Place cursor on unwanted portions and click to select it.
Use Edit > Cut to remove the unwanted portions.
A checkerboard pattern will show transparent areas of Layer 2.
Choose Select > Deselect to clear selected area.
Click on Middle Layer 1 ("meat") ‘Eye’ to Select it.
Click on Move Tool to choose it.
Click and drag Middle Layer 1 ("meat") Image element to desired position.
Click on Background Layer ‘Eye’ to Select it.
Save Combined Image with File > Save to My Computer.
Rename Combined Image. Choose JPG format and 100% Quality. Click ‘Save’.


Lesley University, 29 Everett Street, Cambridge, Massachusetts, USA 02138-2790
(c) George Blakeslee All Rights Reserved


