Task 031b PC Capture audio CD Track(s)
** PC users -
For this exercise, follow the instructions given below to capture (rip) audio CD track(s).
Screen Images below
Capturing audio CD tracks and converting them into MP3 or WAV formats is commonly known as “ripping”. We may do this only to the extent allowed by the CONFU Educational Multimedia Guidelines. When using this process with your students, it is very important that they understand this exception of general copyright prohibitions against copying CD tracks.
We will use the Windows Media Player
I. Launch the Windows Media Player program
II. Setting Options: save folder and file type
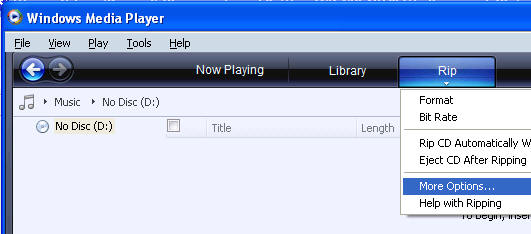
1. Select Rip > More Options …
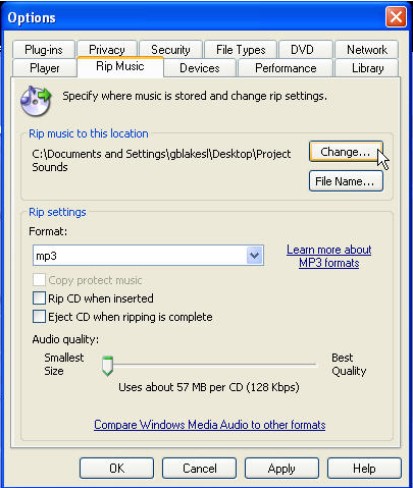
2. Select Rip Music tab
3. Set ‘Rip Music to this Location’ (this is your Save Folder)
Click Change … button Browse to locate desired save folder Click OK
4. Set 'Rip settings'
Choose Format > MP3 from drop down menu
5. Click Apply
6. Click OK
III. Capture (Rip) an audio CD track
A. Insert an audio CD in the computer’s CD drive
If it begins to play, click Stop button
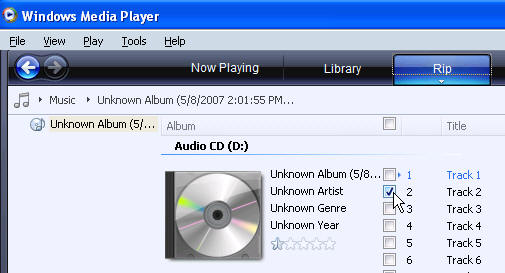
B. Select 'Rip' Tab
Click checkbox of the track(s) you wish to rip
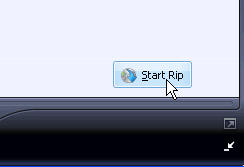
D. Click ‘Start Rip’ button located in lower right corner of Windows Media Player window
E. The program will convert the CD audio track to MP3 format and save it in the pre-determined Save Folder
F. You will find the MP3 format sound track saved in the pre-determined Save Folder (set in step II. 3. above)
Often, the ripped track(s) will be placed in sub-folders for artist and album that are automatically created during the save process.
ECOMP 6016 Online
Teaching and Learning with Multimedia
Dr. George Blakeslee
Lesley University, 29 Everett Street, Cambridge, Massachusetts, USA 02138-2790
(c) George Blakeslee All Rights Reserved
